Showing posts with label video tutorial. Show all posts

Tuesday, December 11, 2018


Spiral Crochet Christmas Stocking


Start at the toe working in continuously spiraling rounds

Toe

with toe color begin with a magic ring

Round 1: sc, hdc, 10 dc into the magic ring working over the ring and the short tail. Pull the short tail pulling your work into a round, do not pull all the way so that you can still see your stitches (12 st)

Round 2: begin crocheting up over the first stitches, 2dc in each stitch around (stitch markers are helpful) (24 st) note: now is a good time to pull the magic ring tightly closed
to make a larger stocking you will add more rounds to the toe, add 12 extra stitches to each round to allow the toe to grow out into a flat disc until it is as large as you want. Experiment to see what size works best for you.

Round 3: dc in each stitch around until the last 2 stitches. Hdc in next st, sc in next st, fasten off toe color.


Foot

With main color (MC), attach in any stitch around on the toe.

Round 1: sc in st where you joined on, hdc in next st, dc in each stitch around.
Note: Once you come back around to the first stitches of round 1 you will no longer work into the toe but into foot (MC) stitches

Round 2: work a modified dc in the first MC st (the sc), dc in next stitch (the hdc), dc in each st around
Note: Modified dc – yo, insert hook into the space between your last stitch and the sc you will work into next, this space is an occupied stitch, the stitch that the sc was worked into at the beginning of the foot, yo pull up a loop, insert your hook into the first sc of the MC, yo, pull up a loop, yo, pull through 3 loops, yo, pull through 2 loops. The modified dc will act just like a normal dc

Round 3 to the end: dc in each st around. Work rounds of the MC making the tube part of the foot, continue until its as long as you like. Mine was a total of 6 inched measuring from the tip of the toe. Pull up a long loop on the MC but do not fasten off or cut the yarn. Look over your project and see if there is any imperfection at the junction between the toe and the foot that you would like to hide, this will become the bottom. If there is no imperfection then just choose whichever side to be the bottom. Flatten the tube, putting any imperfection at the bottom (the sole of the foot).

To make striped foot you will need to attach 2 or more colors.  Attach the colors evenly around onto the toe.  Each color will remain attached for the entire construction of the foot.  Start each color with sc, hdc, dc to ramp the colors up.  As each color moves up over the other color you may want to do a modified dc as previously explained.  Once your stripe colors are attached you will work several stitches in one color, then drop that color and begin working in the other color.  The stitches will chase each other around.  It may be helpful to refer to my spiral mitten pattern or spiral baby mitten pattern and tutorial which is done in a similar way.  If you have trouble understanding I can make a second video tutorial for the striped version, just leave a comment.

Heel

Heel color can match the foot, match the toe, or be a new color.
The heel is attached, worked in rows, turning at the end of each row. The rows will decrease, then increase making an hourglass shape. Once the heel is stitched we will sew 2 small seams to shape the heel. You can make the heel any width but my suggestion is half the total number of stitches in the round. The example shown in 24 stitches in each round, so the heel begins with 12 stitches. You want to place the 12 stitches evenly along the bottom edge so that half are on the front side of the stocking and half are on the back side. For larger stockings you will divide your total stitches in each round of the foot in half.

Row 1: attach the yarn in the stitch that is 6 stitches before the bottom most stitch. Sc in the st you joined on the yarn, hdc in the next st, dc in the next 8 stitches, hdc in the next st, sc in the next st. ch 2 turn (12 st)

Row 2: dc2tog, then another dc2tog, dc in each st across to the last 4 st, dc2tog then another dc2tog. Ch 2 turn (8 st)

Row 3: 4 dc2tog across, ch 2 turn (4 st)

Note: for larger stockings you may have to do another row with 2 decreases at the beginning and 2 decreases at the end

Row 4: 1 dc in each st across, ch 2 turn (4 st)

Row 5: 2dc in the first 2 st, 2 dc in last 2 st, ch 2 turn (8 st)

Row 6: 2dc in first 2 st, dc across to last 2 st, 2dc in the last two st. fasten off leaving a long tail to seam the heel (12 st)

the rows you made should resemble an hourglass. Fold the hourglass in half, right sides together, match row 6 to row 1, row 5 to row 2 and so on. Using the tail and a yarn needle, sew up the sides of the rows. Work the yarn across to the opposite side and sew the seam on the other side in the same way. Once the seams are sown the rest of that tail will be woven in to hide it. The heel is complete. Make sure you have 12 stitches across the top of the heel.

Leg 

Continue with the foot color(s)

Round 1: work 1 dc in each st around. At the point in which the stitches move up onto the heel you may want to do the modified dc as you did earlier to avoid a gap as your stitches bump up onto the heel

Round 2 1 dc in each st around

Continue with round 2 until the leg is as long as you want

Periodically count stitches to make sure you still have the same number of stitches as you had in the foot. Once the foot is as long as you like you will ease down by making a hdc in the second to last st, and then a sc in the last st. You will want your last stitches to be near the back side of the stocking, where the hanging loop will be. 

 Ch 21 for the hanging loop. You can fasten the chain back down to the stocking for the loop or you can make the chain a bit more sturdy by sl st back down the length of the chain then attaching the far end of your chain back down onto the stocking forming a loop. Leave a tail which you can use to reinforce the hanging loop onto the stocking once you are finished with the stocking.

Cuff  (optional)

(use the heel/toe color or a new color)

Foundation: working from the inside of the stocking, attach the cuff color in the st after the st you made the hanging loop in. sc around putting 4 increases evenly around. Sl st into the first st to join the round (28 st) adding these 4 extra stitches will make your cuff just slightly wider than the stocking so once it is folded down it will lay nicely instead of bunching up.

Ribbing row 1: ch 11, turn

Ribbing row 2: in second ch from the hook sc in back loop of each st down the chain (10 st) sc into next 2 sc on the foundation round, turn

Ribbing row 3: working back up the previous row, sc in the back loop of each sc up the ribbing, ch 1 turn

Ribbing Row 4: sc in the back loop of each sc down the ribbing, sc in next 2 sc on the foundation round, turn.

Repeat rows 3-4 around. Once you have come all the way back around you will work into the last row as well as the first row at the same time. This will close up the back seam of the ribbing. To do this you will insert your hook into the back loop of the sc of the previous row as you had been doing and also the corresponding loop on the first row of the ribbing, sc, repeat until your last row is complete and the seam is closed up. Fasten off

Finishing

Hide ends, fold down cuff, fill with goodies.


Tuesday, December 22, 2015

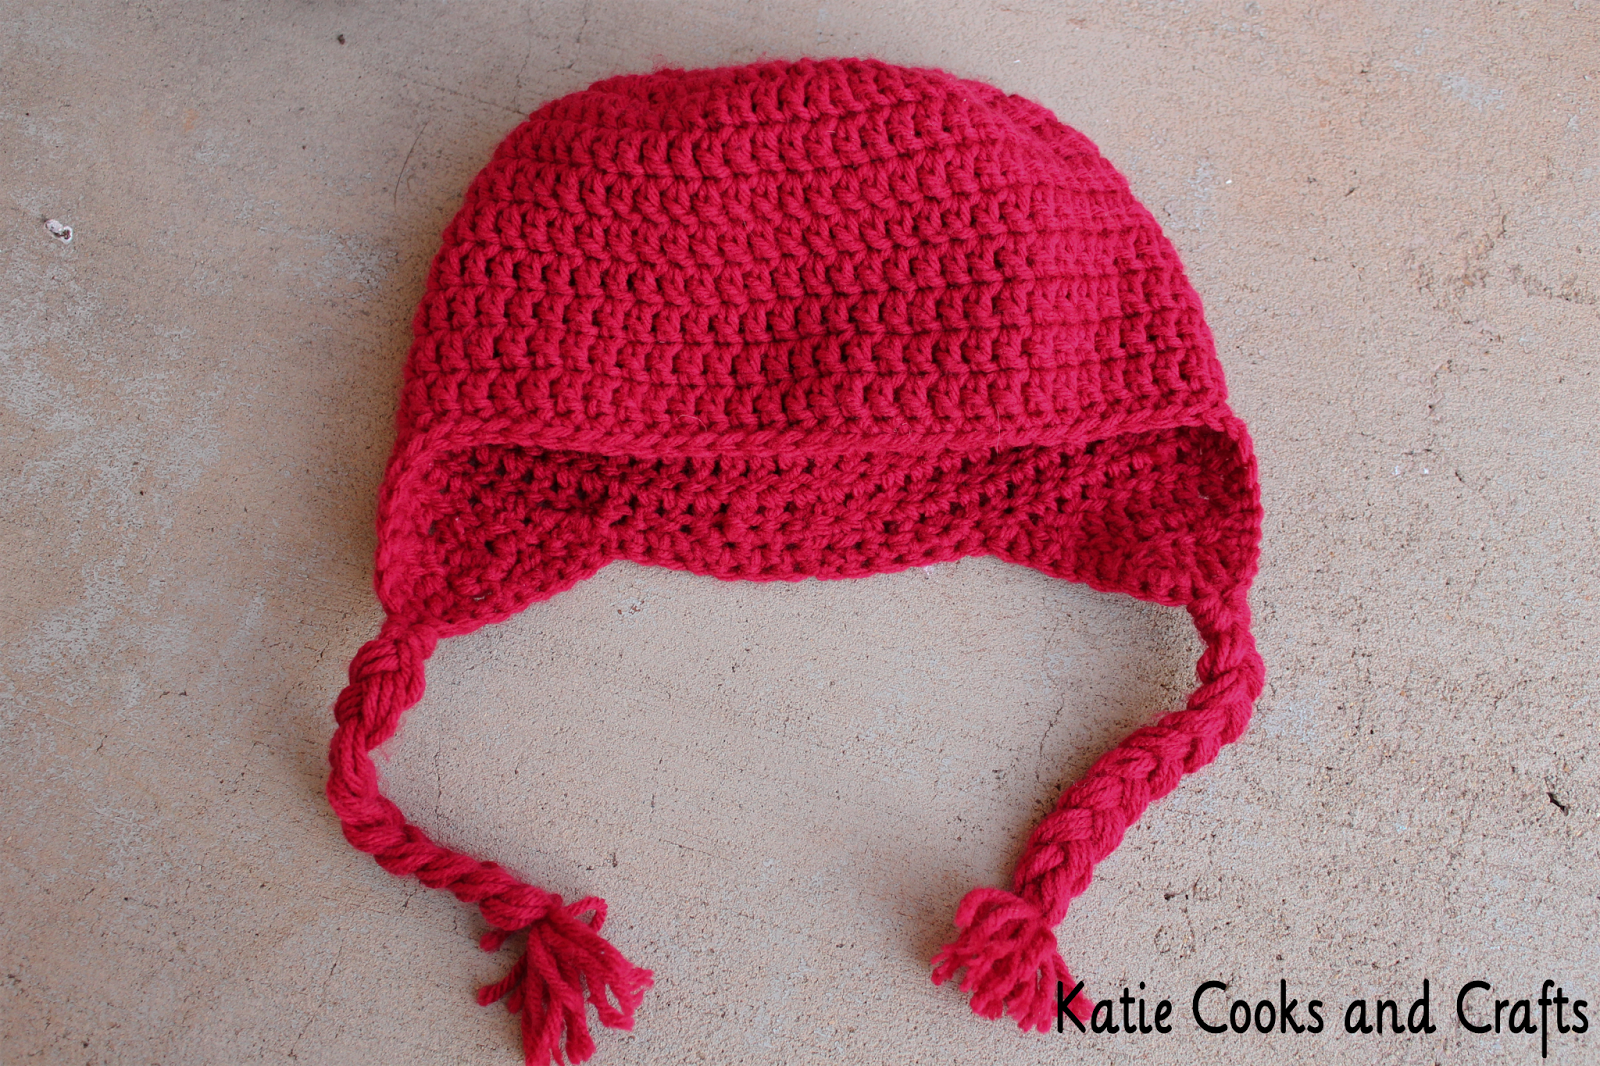
Seamless Crochet Ear Flap Hat


This is a simple double crochet beanie hat with ear flaps.  This hat is worked in a continuous spiral so there is no seam.  This hat can be a regular beanie or add optional ear flaps.


Seamless Crochet Ear Flap Hat

This pattern is written in US crochet terms.  I used worsted weight yarn and a size H crochet hook.  You will also need a measuring tape or ruler, scissors and a yarn needle to hide your ends.  You will need about 3 ounces of yarn


Notes: Think of this hat in 2 parts (3 parts if you are adding ear flaps). Part 1 is the crown or top of the hat, part 2 is the sides, and optional part 3 is the ear flaps. The crown is a flat disc or slightly cupping disc. With each round the disc will grow wider and wider. Once the crown is as wide as you need it for the size you are making, then you will skip to part 2, the sides of the hat. Part 2 is just 1dc in each st. Continue with part 2 until the hat is as long as you like. For a beanie you will want the hat to hit you around the earlobes or make it longer for a slouchy style or if you will roll the brim up. For an ear flap hat you will want to make your beanie a bit shorter, having it end near the middle of the ear. If you make your ear flap hat too long is will fall over the eyes.


Part 1 
The crown of the hat (this will be a flat or slightly cupping disc)
Begin with a magic loop
  1. Work 1 sc (mark this stitch), 1 hdc, 10 dc into the magic loop (working over the loop and the short tail). Pull the short tail to tighten the magic loop (12 stitches)
  2. Work 2 dc in each st around (be sure to move the stitch marker from the last round to the first dc of the new round for every round) (24 stitches)
  3. *Work 2 dc in the next st, then 1 dc in the next st, repeat from * around 11 more times (36 st)
  4. *Work 2 dc in the next st, then 1 dc in the next 2 st, repeat from * around 11 more times (48 st)
  5. *Work 2 dc in the next st, then 1 dc in the next 3 st, repeat from * around 11 more times (60 st)
  6. *Work 2 dc in the next st, then 1 dc in the next 4 st, repeat from * around 11 more times (72 st)
Can you see how this pattern continues? You will always increase by 12 stitches on each round.
The next row would be

  1. *Work 2 dc in the next st, then 1 dc in the next 5 st, repeat from * around 11 more times (84)
Continue until your disc is large enough. Below is a guideline but you can make the crown any size that you want. You do not have to finish a round, you can stop at any point once your disc is the appropriate size. Keep in mind that tightly crocheted hats will have less stretch and loosely crocheted hats will have more give to them

Diameter of hat crown (inches)
Baby : 4-5 inches
Toddler : 5-6 inches
Teen/Adult : 6-7 inches

Part 2 
The sides of the hat

Once the crown is the appropriate size you will continue working dc in a spiraling fashion. Using a stitch marker is no longer needed. You will no longer be increasing and instead of the disc growing wide and wider the disc will begin to cup and the sides of the hat will be formed.

  1. 1 dc in the next st and in each stith around until the hat is as long as you like.
  2. Once the hat is as long as you like you will need to taper down and fasten off. To do that you will work 1 hdc in the next 3 st, then 1 sc in the next 3 st, then 1 sl st in the next st, fasten off


Part 3 
The ear flaps (optional)
Turn the hat so that the tapering decrease at the end of Part 2 is at the center back, this will help make it less noticeable. You will want to make the location of the earflaps. You can put the hat and make where the ear flaps would need to be to cover the ears, or if that is not possible you will need to estimate. The ear flaps should be slightly set back from center, as this is how your ears are slightly set back.

  1. Join the yarn on at the mark where the ear flap starts. To join on you will pinch the new yarn with a spare finger onto the backside of your work (the inside of the hat), insert your hook into the appropriate stitch on the hat, pick up the yarn and pull it through the stitch. Ch 1 and pull on the short tail to snug that ch down and help hold the new yarn on. You will need to continue to hold the yarn on the backside of your work for several stitches until it is secure.
  2. Ch 1, starting in the stitch that you joined the yarn on to, dc2tog, dc in the next 6 st, dc2tog over the next 2 st, ch 1 turn your work
      To do dc2tog: yo, insert your hook, yo and pull up a loop, yo and pull through 2 loops on your hook, yo, insert your hook into the next st, yo and pull up a loop, yo through 2 loops, yo and pull through all 3 loops on your hook
  3. dc2tog, dc in the next 6 st, dc2tog over the next 2 st, ch 1 turn
  4. dc2tog, dc in the next 4 st, dc2tog over the next 2 st, ch 1 turn
  5. dc2tog, dc in the next 2 st, dc2tog over the next 2 st, ch 1 turn
  6. dc2tog twice, fasten off


To finish: work a border of sc, work 1 sc into each stitch along the bottom edge of the hat and work 1-2 sc into the sides of each row of the ear flaps. More or less stitches may be needed for the sc border to lay flat and look smooth. Hide all the ends of the yarn with a tapestry or yarn needle. Add any embelishements you like such as pom pom, tassels or braids to the ear flaps and/or a pom pom to the top of the hat.

This pattern, tutorial and video are my own creation.  Please link back to this original patterns or video when sharing.  Be sure you check out all of my free crochet patterns.


Thursday, December 17, 2015

Easy No Seam Thumbless Baby Mittens ~ No Scratch Mits


These mittens are very similar to the Spiral Baby Mittens only worked in a single color.
This pattern is written in US crochet terms.  I used acrylic worsted weight yard and a size H crochet hook.  You will only need a small amount, about 2 ounces total

  1. Ch 4, working into the top loop only,  2 sc in 2nd ch from the hook, 1 sc in top loop of next ch, 2 sc in top loop of next ch\
  2. Turn your work upside down, working into the other loop of the foundation chain, 2 sc in the other loop of the st you just worked into, 1 sc into the other loop of the next st, 2 sc in the other loop of the last st
  3. Now you will be working under both loops on each stitch as usual. You will not join round with a sl st and you will not turn your work. Place 2 sc in the first sc (this will count as your first increase on this short end, the 2nd increase will occur once you have gone all the way around), then 1 sc in each of the next 3 stitches down the long side, 2 sc in the next 2 sc (here are the 2 increases for this short end), 1 sc in each sc going down the long side
  4. Continue spiraling around, increasing by 2 stitches on the short ends, until you have 20 stitches around  You will end with just 1 increase (the first increase was already completed at the beginning of that round)
  5. Once you have 20 st you will not longer be increasing on the short ends. Place 1 sc in each stitch. Continue spiraling until the mitten measures 3 inches long (for 0-6 month size) or 3.5 inches (6-12 month size)
  6. Next you will work one row of eyelets to lace the drawstring through. To make this row you will *ch 1, skip 1 st, 1 hdc in next st, repeat from * around until you have 10 holes. The 1st and 10th hole will end up on different rows, this is expected and the nature of spiral crochet. Once the drawstring is in it will not be noticeable.
  7.  Work 2 sc into the ch 1 space.
  8. Now continue sc in each st for 3-4 more rows to make a cuff. Add an increase to the short ends of each row of the cuff to flare it out a little, making it easier to get onto baby's hand.
Once the cuff is as long as you like, fasten off by working a final sl st into the mitten and fasten off  Weave in ends.


For the drawstring: Ch 60 (or as long as you like), fasten off. Tie an overhand knot at each end, weave through the eyelets and tie a bow


I created this pattern and tutorial, please link back to this original pattern or the video tutorial when sharing.  Thanks you

You may also like

Rumpled Ripple Rainbow Crochet Baby Afghan Pattern

Nursing Necklace Crochet Pattern and Tutorial


Thursday, June 11, 2015

5 Dairy Free Smoothie Recipes

A Vitamix found itself delivered to my front porch. I don't really know how or why, but it did. My loving husband (my sweet, kind, wonderful husband) ordered it without really telling me so it was a big surprise. Our stick blender died and our food processor was on it's last leg. Instead of buying another $100 blender or food processor that is just going to die on us in a couple years he went ahead and invested in a Vitamix.

 I saw the UPS truck pull up and I assumed my husband had ordered something from Amazon as he is fond of doing. But as the UPS driver emerged from his truck I saw that he was holding a large cardboard box with big bold letters spelling out "Vitamix". What a surprise! Initially I scoffed at the idea of spending so much on one kitchen appliance but I really do love it. I have been experimenting with it as much as possible. I've been making homemade almond milk, smoothies, pureed soups and sauces. I still have more I want to try, like peanut butter, hummus, and dairy free Nutella. I have collected 5 of my favorite smoothie recipes plus a bonuse vegetable juice. I love that I can make vegetable juice without a juicer in my Vitamix.


  Whole Fruit Smoothie - Orange, banana, blueberries and spinach


Mango and Coconut Smoothie - Mango, coconut cream, and coconut milk with a hint of lime


Strawberry Milkshake Smoothie - Strawberries, almond milk and vegan vanilla ice cream

Pina Colada Smoothie - Almond milk, coconut cream, pineapple and banana, garnish with shredded coconut


Shamrock Shake - Sweet creamy peppermint shake with a surprise ingredient

Monday, March 9, 2015

Rumpled Ripple Scarf Pattern


Some people call it zig zag, some people call it ripple or wave, the new trendy name is chevron.  Whatever you call it, its a classic look that I just love.  Most often ripple patterns are made from simple basic stitches such as single crochet or double crochet so they are a great pattern for beginners that are ready for something more than row after row of the same stitch.  Some ripple patterns take motifs from other classic patterns, such as granny ripples or V stitch ripples.  This pattern is borrowing from the cobble stitch pattern.


The cobble stitch (sometimes called griddle stitch) is simply alternating between single crochet and double crochet.  As you come back again with row two you put double crochets into the single crochet and single crochets into the double crochet.  The resulting stitch is thick, textured, and solid.


I wanted to incorporate the texture of the cobble stitch into a ripple pattern for a scarf.  I love the result.  The scarf is solid, with no holes.  Textured but not taking away from the zig zag-ing chevrons.  A simple repeat of a single row so it works up quickly and easily.

This pattern uses US crochet terms.  I used Vanna's Choice Lion Brand yarn,  a medium (#4) worsted weight yarn and size I hook.  Please let me know if you have any questions about this pattern.


Cobble Stitch Ripple Pattern


Special Stitches


Cobble Pattern - alternating dc and sc (each segment of the cobble pattern will be 7 stitches long and start and end with double crochet.

Increase - sc, dc, sc all in the same st

Decrease (worked over 3 stitches)- insert hook into the st, yo, pull up a loop, skip the next st, insert hook into the next st, yo, pull up a loop, yo and pull through all three loops on the hook

Beginning of row decrease (worked over the first 2 stitches of each row starting with row 2)- insert hook into the st, yo and pull up a loop, yo and insert hook into the next st, yo and pull up a loop, yo and pull through 2 loops, yo and pull through all three loops on the hook - This stitch counts as a dc

End of row decrease (worked over the last 2 stitches of each row starting with row 2) - yo and insert the hook into the st, yo and pull up a loop, yo and pull through 2 loops, insert the hook into the next st, yo and pull up a loop, yo and pull through all three loops on the hook- This stitch counts as a dc


Pattern


Foundation chain: ch multiples of 18 -1 (17, 35, 53, 71 etc)  For my scarf I did ch 35 (2 repeats)

Row 1: dc in 3rd ch from hook (counts as the first dc in the cobble pattern), *work the cobble pattern for a total of 7 stitches up the side of the front mountain.  Increase in the next ch, work the cobble for a total of 7 stitches down the back side of the mountain, decrease over the next 3 stitches, repeat from * across.  Do not work the final decrease at the very end, just end with the 7 stitches down the back side of the last mountain. Ch 1 turn.

Row 2: Work beginning of row decrease over the first 2 stitches (counts as the first dc of the cobble pattern), *work the cobble pattern for 7 stitches up the front side of the mountain, increase, work cobble pattern for 7 stitches down the back side of the mountain, decrease over the next 3 st, repeat from * across.  Do not work the final decrease, instead work the end of row decrease over the last 2 stitches (will count as the last dc in the cobble pattern) ch 1 turn.

Row 3 and onward: Repeat row 2 changing colors as you like until your project is as long as  you like.  For my project I did 3 rows of each color before changing to the other color.  For the best results from this pattern I recommend using as least 2 colors.

To change colors:  

I find I get the best results if I change colors by finishing the last stitch of the row with the new color.  For this pattern that will be the End of Row Decrease stitch.  Work the stitch as normal but just before the final "yarn over and pull through all three loops on the hook" drop the working yarn to the back, and holding the new color yarn from the back work the final "yarn over and pull through all three loops on the hook" in the new yarn.  The tails from this color change will need to be woven into the work with a yarn needle at the end.


This pattern and video tutorial is my own creation.  Please link back to this original blog post or video when sharing.

About Me

My photo
Welcome to my little corner of the web. I love to share things I make and ideas I have. I hope you enjoy!