Pages

Monday, December 29, 2014

DIY Wooden Blocks ~ Easy Wood Toy


Perhaps its an over idealistic notion but I hope to be able to make a handmade gift for my child(ren) each year for Christmas.  For my little one's first Christmas I made her a very simple fabric doll.  It is lopsided and simple but I loved making it for her and she has loved playing with it.


This year I decided the gift I wanted to make was a set of wooden blocks.  Only problem is, I don't know the first thing about making wood toys.  I looked online and most instructions are geared towards hobbyist and wood workers with a workshop to rival Santa's elves.  I don't have many tools of my own, but luckily my dad does.  I used his tabletop mitre saw and carpenters square. 

Making blocks usually requires you to rip cut, or cut the board lengthwise, to get small narrow pieces.  That is difficult to do and usually requires a table saw.  Instead I found long narrow hobby boards that didn't need to be rip cut.  They are made of nice hardwood.  I picked poplar but they also had oak and maple.  They were already the perfect width and depth, I just needed to cut them into the size blocks that I wanted.  That is where the power saw came in.

The boards I bought were 1 1/2 inches by 1 1/2 inches.  I cut twelve blocks 1 1/2 inches long to make cubes, I cut six into three inch lengths and four into  4 1/2 inch lengths.  In total I made 22 blocks.  I liked these sizes because you could stack a 3 inch and a 1 1/2 inch block together to fit beside a 4 1/2 block.  Or two 1 1/2 inch blocks next to a 3 inch block.  It all seemed nice and proportional.


After I cut the boards I needed to sand them.  The poplar cut pretty easily even though I had never used that kind of power saw before.  I had a few rough cut edges and a little bit of minor splintering.  I sanded the blocks by hand. If I had access to a belt sander I would have loved to use one.  It took me a couple hours to sand all the blocks.  I wanted to smooth them as well as blunt the corners and points.

Once the blocks were sanded I wanted to add some color.  I knew I didn't want to paint them.  The poplar has some beautiful wood grain that I wanted to show.  I instead opted to dye the wood with food coloring.  I started with one color, yellow, red, blue and green.  Then I started mixing two colors.  Mixing blue with green, mixing red with yellow, mixing red with blue and so on.  Once I had those in-between colors I continued to mix until I had 22 unique shades.

I let the blocks dry overnight and when I went to check on them on the morning I found that the dye rubbed off the blocks.  I washed the blocks under running water to rinse the majority of the dye out of the wood then let them dry again.  This time there was only very minor color transfer even with vigorous scrubbing.


My last step was to condition and polish the wood.  I made a batch of Woodmouse beeswax wood polish using coconut oil and beeswax.  I rubbed the wood polish into the wood, let it soak in for a couple hours them I buffed the blocks with a clean cotton cloth.  I added essential oils to the leftover wood polish and gifted it to my mom as a lip balm/cuticle cream/rough skin treatment. Two gifts in one! 

These blocks were a labor of love.  Made for my sweet girl for her second Christmas.  I'm really proud of how they turned out and I hope she has lots of fun with them.

Thursday, December 18, 2014

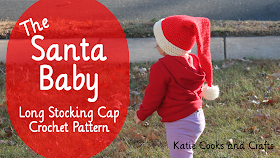
Santa Baby, Long Stocking Cap Crochet Pattern


This hat turned out so cute.  I made it just for personal use but I thought others may like to make one as well.  Like so many of my patterns, this hat is worked in a continuous spiral.  It is so much easier than joining rows and makes for a seamless hat.  I made this hat in classic Santa Claus colors but you could make it in any color combination you like.

This pattern is written with US crochet terms.  You may want to use a stitch marker or a scrap piece of yarn to make the start of each row.  I find its easy enough without stitch markers, so long as you can finish a row before putting it down, and keep track of which row you are on if you do need to set it down.  I have put the stitch count at the end of each row so you can double check yourself as you go.

You will need about 3 ounces of worsted weight yarn in the main color, 1 ounce or less of contrasting color, size H crochet hook (or a similar size would also work), a pom pom maker or a way to make a pom pom or tassel (there are lots of directions online to make pom poms without a pom pom maker) and a length of 1/4 inch elastic (optional)


Long Stocking Cap
With main color, begin with a magic ring, or alternatively you can ch 3, sl st in 3rd ch from the hook to form a loop and work your first stitches into that loop.
Row 1) 1 sc, 1 hdc, 1 dc into the magic ring or loop. (3 stitches)
Row 2) continue around, do not join or start a new row, just continuously spiral around.  Put 2 dc in the first sc you make in row 1, then 2 dc in the next stitch which is the hdc, then 2 dc in the 3rd st from row 1 which is the dc  (6 st)
Row 3) 1 dc in each st around (6 st)
Row 4) *2 dc in the next st, 1 dc in the next 1 st, repeat from * 2 more times (9 st)
Row 5) repeat row 3 (9 st)
Row 6) *2 dc in next st, 1 dc in next 2 st, repeat from * 2 more times (12 st)
Row 7) repeat row 3 (12 st)
Row 8) *2 dc in the next st, 1 dc in the next 3 st, repeat from * 2 more times (15 st)
Row 9) repeat row 3 (15 st)
Row 10) *2 dc in the next st, 1 dc in the next 4 st, repeat from * 2 more times (18 st)
Row 11) repeat row 3 (18 st)
Row 12) *2 dc in the next st, 1 dc in the next 5 st, repeat from * 2 more times (21 st)
Row 13) repeat row 3 (21 st)
Row 14) *2 dc in the next st, 1 dc in the next 6 st, repeat from * 2 more times (24 st)
Row 15) repeat row 3 (24 st)
Row 16) *2 dc in the next st, 1 dc in the next 7 st, repeat from * 2 more times (27 st)
Row 17) repeat row 3 (27 st)
Row 18) *2 dc in the next st, 1 dc in the next 8 st, repeat from * 2 more times (30 st)
Row 19) repeat row 3 (30 st)

can you see where this is going?  you need to continue alternating rows in which you increase by 3 stitches, and rows in which you do not increase at all.

As the hat gets longer is also gets larger around the end.  Just continue in this fashion until the opening of the hat is large enough to fit.  The tail should be correspondingly long enough but if you would like it longer you can do row 3 (the row with no increases) several times to make the hat longer but not larger around.

Once your hat is as long as you like, switch to a new color if you would like a contrasting color for the brim.  Otherwise continue with the same color.  Repeat row 3 (the row with no increases)  5 or more times.  The larger the hat, the larger the brim should be to look balanced.

Finish the hat with a pom pom or tassel on the tip of the tail.  The weight of the pompom/tassel will pull the tail down so that it hangs properly, otherwise your hat may look more like a gnome's hat rather than a jolly old elf's hat.  To fit my little one better I added some 1/4 inch elastic.  Weave in through the dc of the last row in main color.  Once the brim is folded up it will hide the elastic and it provides a better fit.

I hope you enjoy this pattern.  Feel free to make this for your self, to give as a gift or to donate.  No commercial license are available, please do not sell this pattern or the finished item for profit.  It was designed and written by me, please credit me as designer and link back to this original pattern when sharing.  I appreciate your ongoing support, its the only way I can continue to produce patterns and tutorials.

You may also be interested in
Rainbow Swirls Bonnet
Rainbow Swirls Hat
Spiral Baby Mittens
Curly Crochet Christmas Ornament
Starburst Ornament


Tuesday, December 16, 2014

Curly Crochet Christmas Ornament ~ Pattern and Video Tutorial


I love soft, lightweight ornaments.  You can hang them low without worries of babies or kitties breaking them and you can hang them on even flimsy Charlie Brown style trees without the branches sagging too much. This ornament is incredibly quick and easy to make.  I can make one up in about 5 minutes with about 5 yards of yarn.  You can make them in all sorts of bright colors.  Make up a bunch to give to friends and family but make sure you keep a few for yourself.

This pattern uses US crochet terms.  If you have any questions, leave a comment and I will be sure to get back to you.

You can use any type of yarn (or even thread) for this pattern.  In the tutorial I used Red Heart Super Saver and a size G hook but any hook that matches the yarn you are using would be fine.  Gauge is not very important for this pattern as a slightly larger or smaller ornament would still work and look lovely.  Other than that, the only other tool you will need is a pair of scissors.


BLO - back loop only
ch - chain
dc - double crochet
sl st - slip stitch

Curly Christmas Tree Ornaments

Leave a 6 inch tail at the beginning 
Ch 18 (you can adjust the number of chains, but I recommend not going any shorter than 12 ch) 
3 dc in BLO of 4th ch from the hook and in each ch to the last 2 ch
2 dc in BLO of second to last ch, ch 3, sl st into that same space (the second to last ch)
Ch1 to fasten off, pull a long tail (about 6 inches), clip your working yarn and pull the yarn through that last ch.  Pull snug to tighten that last chain down.
Pull the beginning tail snug to tighten the last ch of the foundation chain down.
Holding the two long tails together, tie an overhand knot to create a hanger, clip the excess tails for a tidy finish.  Shape the ornament with your fingers in whatever shape you like.  


Thank you for checking out my pattern and tutorial!  Feel free to use this pattern for yourself or to give as a gift.  Please link back to this original blog post or the video tutorial when sharing.

You may also be interested in 
Mini Woven Basket (could be used as an ornament)

Thursday, December 4, 2014

Molasses Cookie Recipe


I used to have marathon cookie baking sessions with my friend Matt.  He made a great molasses cookie and he was kind enough to share his recipe with me.  It's chewy, spicy, and always comes out great.  I know some people will sub out the shortening for butter but to get the best texture shortening is the way to go.


Ingredients
1 1/2 cups shortening melted
2 cups white sugar
1/2 cup molasses
2 eggs
4 cups flour
4 tsp baking soda
2 tsp cinnamon
1 tsp ground cloves
1 tsp ground ginger
1 tsp salt

Mix together dry ingredients
Cream together shortening and sugar.  Add eggs one at a time then add the molasses.  Stir in dry ingredients.  Dough will be stiff.  Scoop with a cookie scoop or portion out dough into walnut size balls.  Roll dough in you hands to form smooth balls.  Roll balls in sugar, place on a cookie sheet about 2 inches apart.  Press the dough balls with the bottom of a glass to flatten slightly.  Bake at 375 F for 8-10 minutes.  Cool on a wire rack.  The cookies will puff up then shrink back down to a crinkly chewy cookie as they cool.

Check out all the great recipes all Cookie Week long!

Wednesday, December 3, 2014

Pecan Sandies


Pecan sandies are one of those cookies you make to impress.  They are the gem of a cookie platter and the talk of the cookie exchange.  I don't know if its the buttery crumbly cookie or the big fat pecan crowning the buttery crumbly cookie.  Either way, they are a delicious addition to Cookie Week!


Ingredients
1 cup (2 sticks) dairy free margarine (Earth Balance) feel free to use butter if you are able
1 cup canola oil
1/2 cup sugar
1/2 cup brown sugar
1 cup powdered sugar
2 eggs
1 tsp vanilla
4 cups flour
1 tsp baking soda
1 tsp cream of tartar
1 tsp salt
2 cups chopped pecans plus pretty pecan halves for the top of each cookie if desired

Mix the dry ingredients
Cream the margarine, oil and the three sugars until a smooth batter
Add eggs, one at a time, then add vanilla
Spoon the dry ingredient and mix just until incorporated.  
Stir in the chopped nuts
Chill dough for about an hour then scoop and bake OR
Scoop the dough then chill 20 minutes then bake OR
Scoop the dough, then freeze for about 1 hour then transfer to a zipper bag and store in the freezer.
When it's time to bake, roll each dough ball in granulated sugar, top each dough ball with a pecan half or slightly flatten, then bake at 375 F for 10 -12 minutes.  Remove to a wire rack, cool, and store in an airtight container.

Be sure to check out all the other great recipes all Cookie Week long!

Tuesday, December 2, 2014

Peanut Butter Oatmeal Cookie Recipe


This cookie is a delicious combination of a chewy oatmeal cookie and a sweet peanut-y peanut butter cookie. This is another great recipe to make ahead and freeze.


1 ½ cup flour
2 teaspoon baking soda
1 ½ cup quick cooking oats or rolled oats that have been very lightly pulsed in a food processor
2 sticks ( 1 cup) dairy free margarine or butter ( add ½ tsp salt if using unsalted butter)
1 cup packed dark brown sugar
½ cup white granulated sugar
1 cup conventional creamy peanut butter (if using natural peanut butter you may want to bump up the sugar and salt)
1 teaspoon vanilla
2 eggs


Mix dry ingredients. Cream together margarine, brown sugar and white sugar. Add peanut butter and beat again until fluffy and lightened in color. Add vanilla. Add eggs, one at a time, incorporate each egg fully after each addition. Spoon in dry ingredients and mix until just combined. Scoop onto an ungreased cookie sheet leaving 1 ½ inches between each cookie. Bake at 350 F for 12-14 minutes until lightly golden brown. Remove to a wire rack to cool.

Check out the rest of the great cookie recipes all Cookie Week long!

Monday, December 1, 2014

Vivian's Spice Drop Cookie Recipe


I love these cookies.  This was my great aunt Vivian's recipe.  One of those good old fashioned recipes that calls for oleo and "handfuls" of things.  I made minor changes only to make this dairy free.  I switched out the oleo for Earth Balance vegan margarine and I use chocolate chips made without dairy ingredients.     I have great memories of them and I make them every year for Christmas.

These cookies are soft and cake with warm spices, raisins, chocolate and nuts.  I hope you give this recipe a try and let me know what you think.


Ingredients
4 cups flour
1/2 tsp baking powder
1 tsp baking soda
1 tsp ground cinnamon
1 tsp ground nutmeg
1/2 tsp ground ginger
1 1/2 cups sugar
1 cup (2 sticks) Earth Balance Dairy free margarine *sub butter if you would like
2 cups raisins
1 cup chocolate chips *Ghiradelli semi sweet chips have no dairy ingredients (made on shared equipment)
1 cup chopped walnuts

In a small sauce pan combine the raisins with about 2 cups of water.  Bring to a boil and simmer for about 15 minutes until the raisins begin to plump up.  Reserve 1 cup of the cooking liquid and cool this liquid and the raisins.

Combine the dry ingredients

Cream the margarine and sugar for 2 minutes, scrap the bowl and continue to cream until light and fluffy.

Add the eggs, one at a time, allowing them to fully incorporate after each addition.

Spoon the dry ingredients into the creamed ingredients in 2-3 additions, alternating with the cooled raisin juice.

Fold in the cooled raisins, chocolate chips and walnuts.

Chill dough for 1-2 hours (or longer) then scoop the dough onto a cookie sheet lined with parchment paper or silicone baking sheet.  Allow room for the cookies to spread.

Bake at 350 F for 12-14 minutes until they begin to brown.

Cool completely on a wire rack then store in a airtight plastic container.  Lay wax paper or re-use the parchment paper from the baking sheet between the layers of cookies to prevent them from sticking to each other.

Check out the other great cookie recipes all Cookie Week long!